Spring cleaning is one of the best ways to get your house ready for a fresh new season. Your kitchen is one of the most consistently engaged rooms in your house, which means it will need a thorough spring cleaning. We’re not just talking about organizing your fridge (although we have an excellent blog post that outlines how to organize your fridge and keep produce fresh) – we’re encouraging you to do a deep spring clean of kitchen cupboards, counters, sinks, pantries, and everything in-between!
Here are our top 10 tips for kitchen spring cleaning (plus a free downloadable kitchen spring cleaning checklist that will help keep you on track with your spring cleaning tasks)
1. Start From The Top
To avoid getting dust or dirt on surfaces you’ve already cleaned, start your kitchen spring cleaning from the top! Here are some of the tasks to start with:
- Dust off light fixtures, ceiling fans, and the tops of cupboards
- Clean windows and remove curtains for washing
- Dust off the top of your fridge
- Clean any kitchen décor or wall art
2. Wipe Down Common Surfaces
Almost every surface in your kitchen should be wiped down during your kitchen spring cleaning. Here are some of the common surfaces you should wipe down and/or disinfect:
- Tables
- Chairs
- Countertops
- Cupboard doors and knobs
- Drawers and knobs
- Sinks and faucets
- Exteriors of appliances, including the surface of your fridge, microwave, and oven
While wiping down surfaces, remove non-kitchen clutter that tends to accumulate on countertops and tables. This is also a great time to collect all your kitchen linens, chair cushions, curtains, and cloth oven mitts for washing.
3. Clean & Organize Cupboards & Drawers
This can seem like a daunting task, but if you tackle one drawer or cupboard at a time, it will go quickly. Remove everything from the cupboard or drawer, wipe the interior clean, then re-organize its contents neatly. If you find anything you no longer need, dispose of it properly or put it in a donation pile. You may be able to create some extra storage space during this process, so if you’ve been wanting to reorganize any of your kitchen storage, this is the time to do it!
4. Sweep & Mop Your Floors
Thoroughly sweeping and mopping your floors will make your kitchen sparkle! Don’t stop at cleaning the visible floor areas – wherever possible, clean the floor underneath larger appliances, rugs, bins, or planters, and use slimmer vacuum heads or brooms to get into hard-to-reach corners.
Appliance Cleaning & Maintenance
With all your surface areas spic and span, it’s time to tackle your appliances.
5. Clean & Check Small Appliances
Tackle one small appliance at a time, thoroughly cleaning each one inside and out. You can also check manuals for proper cleaning instructions. During the cleaning process, perform any small maintenance tasks that may be needed for proper care of your appliances: change any bulbs, clean out and/or change filters, and note any other issues you may be having with your small appliances.
Here are some examples of small appliances you may want to clean:
- Coffee maker
- Toaster/Toaster oven
- Kettle
- Blender
- Microwave
6. Clean & Check Large Appliances
Next you can tackle your larger appliances – again, focus on one appliance at a time. Once again, consult any manuals to ensure you are cleaning and performing maintenance properly.
Some of the most common large appliances that you will want to clean inside and out include:
- Stove and oven
- Fridge and freezer
- Dishwasher
Food Re-Organization
After you have cleaned all your kitchen surfaces and appliances from top to bottom, it’s time to start organizing one of the most important things found in your cupboards, fridge, and pantry – your food!
7. Purge & Organize Cupboards & Pantries
It is best to start with organizing non-perishable storage areas as many items that may need to be disposed of will not emit any odors when discarded.
When cleaning out and re-organizing cupboards and pantries, here are some tips:
- Dispose of any items that have passed their expiry date.
- If you find any items that are still safe to eat, but that you know your family will not need, set them aside and bring them to a local food donation center.
- Bring any items that have approaching best before or expiry dates to the front of your cupboards or pantry. This will keep them fresh in your mind as items that need to be consumed sooner.
- Take the time to reorganize your cupboards and pantry for maximum efficiency. Keep similar food items stored in the same area, clear your shelves of empty boxes or containers, and use glass jars to neatly store pasta, grains, quinoa, and other bulk non-perishable items.
- Make time to take stock of your spice rack. Note any spices that need to be replenished, if there are any duplicates that you can combine, and old spice containers that can be thrown away.
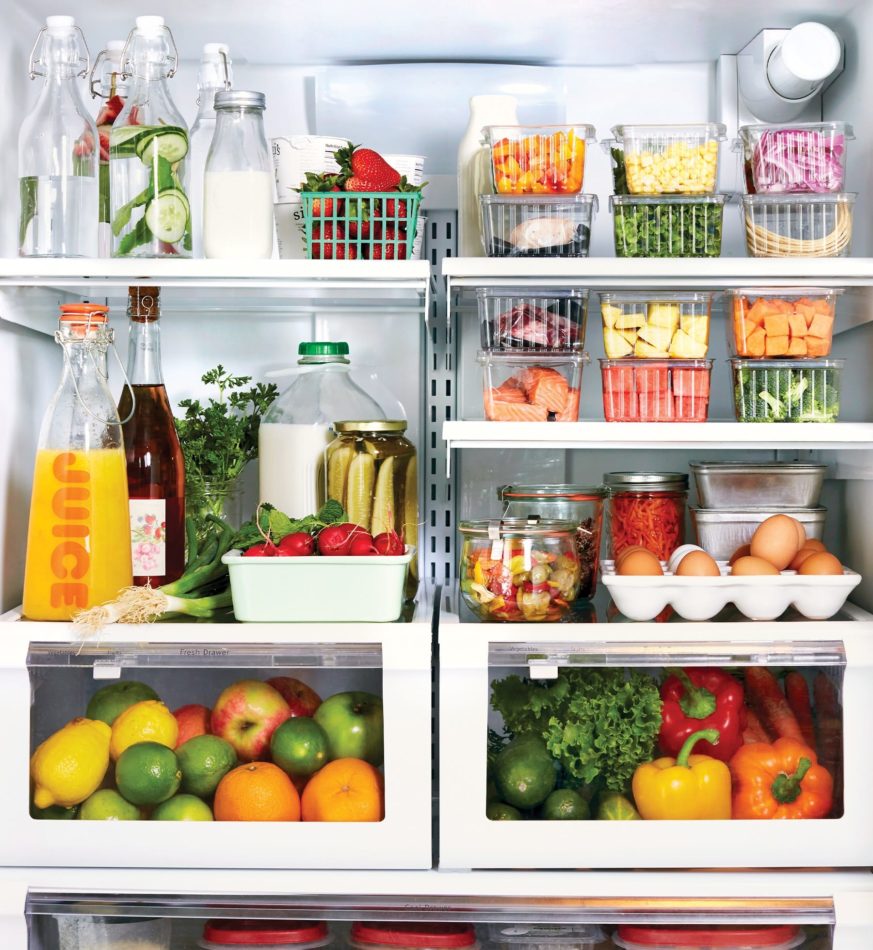
8. Organize Your Fridge & Freezer
Next up is tackling the organization of your fridge and freezer. You can check out our fridge organization guides for lots of great tips on making your fridge cleaner, easier to navigate, and a fresher space in which your produce can be stored. Here are a few of our favorite tips from the guide to get you started:
- Track leftovers by labeling them with an ‘eat by’ date to ensure you limit your family’s food waste and keep your fridge organized.
- Keep condiments and non-dairy drinks in the fridge door to keep fridge shelves uncluttered.
- Do some research on the produce items you are buying to ensure you’re keeping the proper items in the fridge versus on your countertop. You can also consult our Veggie Storage Guide for more info on how to properly store Tomatoes, Peppers, and Cucumbers.
Many of the tips from our fridge organization guide can also be applied to organizing your freezer. Here are a few extra freezer-specific tips:
- Since some items last longer in the freezer than others, use labels so you know exactly when you need to eat your frozen foods.
- If you’re freezing sauces or soups, put them into freezer storage bags and freeze flat. This will make them much easier to stack and store.
- Make good use of your freezer storage space by storing similar items in bins. Store meat in one bin, fruits and vegetables in another bin, soups in another, and so on.
Spring Extras
You’re almost done spring cleaning your kitchen! Here are some finishing touches to help get your kitchen ready for a fresh season.
9. Switch Your Dishware & Linens
To bring a breath of fresh air to your kitchen space, switch out your dishware and linens to reflect a brighter, lighter season. Bring out your pastel dishcloths, spring-themed décor, table runners, and anything else that might brighten up your kitchen space. In the process, pack away any winter dishware, linens, and décor (and make sure you label the box so it’s easy to find again at the end of the year).
10. Donate!
Gather up any unused (but functioning) kitchen items and bring them to a local donation center. Make sure you clean any items you will be donating before dropping them off.