Icing a cake elevates it to a visual masterpiece, harmonizing flavors and aesthetics in a delightful union. Ombre cakes, with their graceful color transitions, take frosting to new heights. This comprehensive frosting guide empowers you with the knowledge and skills to achieve a flawlessly iced ombre cake. Whether your aim is a classic ombre design or a bold gradient experiment, the following steps will guide you to a smooth, polished finish that rivals professional bakeries.
Essential Tools and Ingredients:
Before you embark on the journey of icing an ombre cake, it’s crucial to gather all the necessary tools and ingredients to ensure a smooth and successful process. Here’s a comprehensive list of what you’ll need:
Tools:
- You’ll require three 8-inch round cake pans to bake your cake layers.
- A good-quality whisk and a set of mixing bowls for preparing your cake batter and frosting.
- An electric mixer, either a stand mixer or a hand mixer, to beat your cake batter and frosting to perfection.
- Both offset spatulas and a straight spatula for spreading the frosting evenly.
- These are essential for cooling your baked cake layers.
- A cake turntable makes it easier to apply frosting evenly and achieve a smooth finish.
- To trim the cake layers if needed and ensure even stacking.
- If you plan to add decorative elements using piping, you’ll need piping bags and various tips.
- To create the ombre effect, you’ll need purple gel food coloring in light and dark shades.
- Depending on your design, you may want edible flowers, sprinkles, or edible glitter to enhance your ombre cake.
Ingredients:
For the Cake:
- 2 1/2 cups of All-Purpose Flour: The main dry ingredient for the cake.
- 2 1/2 teaspoons of Baking Powder: To help the cake rise and become fluffy.
- 1/2 teaspoon of Salt: To enhance the flavors in the cake.
- 1 cup of Unsalted Butter, softened: The primary fat in your cake batter for richness and moisture.
- 2 cups of Granulated Sugar: For sweetness and structure in the cake.
- 4 Large Eggs: Providing structure and moisture to the cake.
- 2 teaspoons of Vanilla Extract: For a delightful, aromatic flavor.
- 1 cup of Whole Milk: To create a moist and tender crumb in your cake.
For the Frosting:
- 2 cups of Unsalted Butter, softened: The base for your frosting, providing creaminess and flavor.
- 4 cups of Powdered Sugar: For sweetness and texture in the frosting.
- 2 teaspoons of Vanilla Extract: To add a delightful vanilla flavor to the frosting.
- Purple Gel Food Coloring: Match the food coloring to your cake layers for a seamless ombre effect.
With these essential tools and ingredients at your disposal, you’re ready to embark on the journey of icing a stunning ombre cake that will impress your friends and family.
Preparation: The Crumb Coat:
The crumb coat lays the foundation for a beautifully iced cake, concealing crumbs and providing a flawless canvas for your final frosting layer. You will learn the significance of a crumb coat, accompanied by step-by-step instructions for its precise application. Expert tips ensure your crumb coat is executed flawlessly.
Creating the Ombre Effect:
Before commencing the frosting process, meticulous planning of your ombre design is crucial. We explore the selection and mixing of frosting shades to achieve your desired gradient. In addition, you will discover strategies to accomplish seamless transitions from one color to the next.
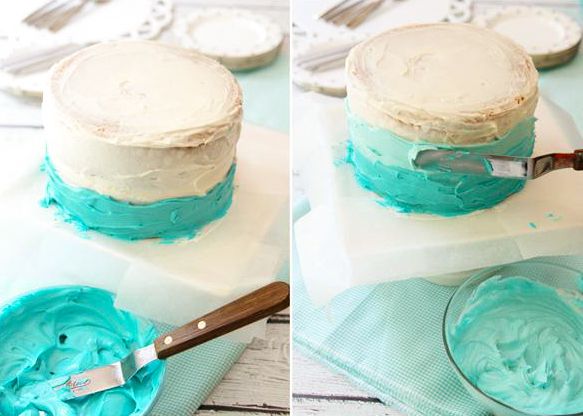
Layering and Frosting: The Ombre Effect:
This is where the magic unfolds. You will be guided on how to skillfully apply ombre frosting to the cake layers, ensuring a uniform and visually pleasing finish. Techniques for creating consistent layers and blending colors to maintain the ombre effect are outlined, providing a step-by-step approach to the frosting process.
Smoothing and Texture: Achieving a Polished Look:
A smooth, polished finish is the hallmark of a professionally iced cake. In this section, you will find tools and methods to achieve a flawlessly smooth frosting surface. Strategies for incorporating texture and design into your cake are explored, allowing you to realize your desired aesthetic.
Decorative Flourishes: The Final Touches:
Once your ombre cake is expertly iced, it’s time to infuse your unique touch. This section offers creative ideas to enhance the ombre design and make your cake truly one-of-a-kind. Whether you opt for edible elements, sprinkles, or other embellishments, you will find the inspiration needed to put the finishing touches on your edible masterpiece.
Conclusion:
In the realm of baking, icing an ombre cake is the pinnacle of culinary artistry. The end result is not just a delectable treat but a masterpiece of edible art. This frosting guide empowers you to elevate your ombre cake creations to new heights, transforming your baking endeavors into a visual and flavorful delight. Celebrate your masterpiece and let it ignite your passion for continued experimentation and refinement of your frosting skills, for the world of cake decoration is as boundless as your imagination.